What is Robot Framework?
The Robot Framework is an open source, general purpose test automation framework used for acceptance testing and streamlines it into mainstream development. This framework is based on Python, and when Selenium2Library is added then you can get a very powerful test suite.
In this document I am going to explain step by step how to use this framework to do end-to-end testing of websites.
Requirements
The requirements vary depending on how you want to run your tests. You can setup a local testing environment, that is, using the command console of your OS, or you can test using a container.
Local environment
If you are going to run your tests directly from your OS command console, then you need to install the following:
- Python 3.8 or higher (https://www.python.org/)
- Virtualenv (https://pypi.org/project/virtualenv/)
- WebDriverManager (https://github.com/rasjani/webdrivermanager)
- Once you have these packages installed, do the following:
- Set a virtual environment in an empty folder and activate it.

- Create a file called requirements and write the following to it:

- Install the requirements using the following command:

That’s it, your test environment is ready to create tests and run them.
Container
To work with containers, all you need is to have Docker installed on your system. If you do not have it installed yet, check the official Docker site for the version that best suits your system.
Understanding the test files
With a properly installed system, let’s focus on testing with the Robot Framework. One of the strengths of the Robot Framework is that the test files are simple to write and easy to understand. The test configuration is written in a tabular format with each column having separate elements such as test element. The Robot Framework allows flexibility in specifying the separations among the different columns in a test file as well as supporting different formats for the test files, which you can choose at your discretion.
Some of the supported formats are:
- HTML
- TSV
- Plaintext
- Piped text
To learn more about how to use all these file types and some others, visit the official Robot Framework documentation. In this document I am going to use plain text files separated by spaces.
The basic structure of a test file is as follows:
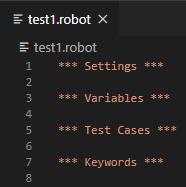
- The file extension can be .txt or .robot, I am going to use .robot to differentiate these files from others.
- In the Settings section we will write everything that is required to start the test.
- In the Variables section, as its name implies, we will write the variables that are required for the tests.
- In the Test Cases section, we will write our tests.
- And finally, in the Keywords section we will write the auxiliary sections of our tests. Let’s understand these sections as if they were functions of a program.
Something that is very interesting is that all these sections are optional. That is, if for example you do not need variables, you simply leave this section blank or delete it completely.
Settings
A settings section looks like this one:
Here you can import different resources and libraries that you need to run your tests. You can also specify which will be the Setup process and the Teardown process for your tests at Suite or Test level. You can also add descriptive lines of text for your test in the documentation key.
Variables
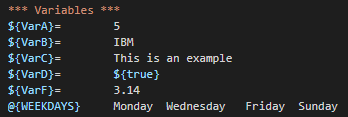
Variables are written like this:

Between the variable and its value, it is required to have more than one space. In this example I have aligned all the values so that it looks good, but that is not necessary. You can put the number of spaces you want between the variable and its value, if they are 2 spaces or more.
Test Cases
In this section we will write all the test cases that we want to cover with this file. A section of test cases looks like this:

From the previous image we can see the following:
- Each test case begins with a descriptive name. This name is arbitrary, that is, you decide what you want to call your test case.
- All keywords that are part of the test case are indented after the name of the test case.
- In the first test case we have a variable called rc that will receive the result of the comparison of two variables. “Compare Two Variables” is a function or keyword that receives two variables and returns something, that something will be stored in the rc variable.
- The same happens in the second test case, there is a keyword or function called “Check Variable Value”, whatever returns this keyword will be stored in the variable rc.
- The first two test cases end by printing the value of the variable rc.
- In the last test case we only invoke keywords, in some cases we send variables and in others we don’t.
Keywords
Keywords are the core of the tests; here you will be able to define different actions for your tests. A Keywords section looks like this:
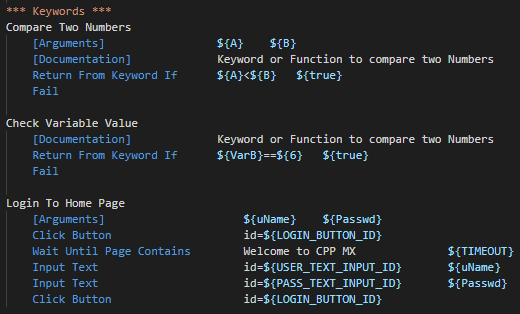
In the image above we are literally creating three functions that will be called from the test cases.
- The first function receives two arguments, A and B. If A is less than B then it returns true. If not, the test fails.
- In the second function it is not expected to receive any argument, and it only verifies that a variable called VarB is equal to 6. If this is correct then it will return true, otherwise the test will fail.
- The last function receives two arguments, uName and Passwd. Then call a series of keywords or functions. If any of these fails then the entire test will fail.
Reports
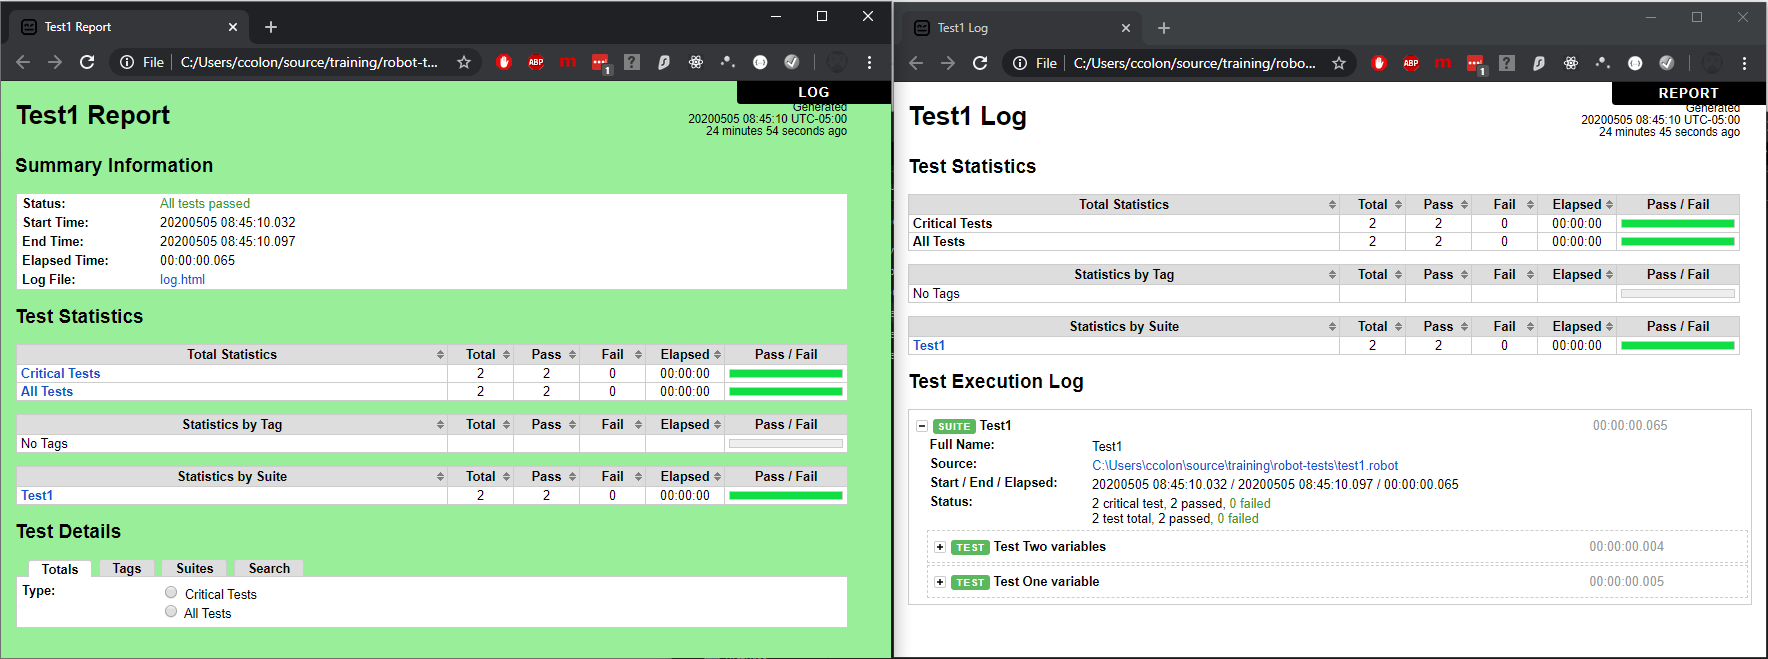
The Robot Framework generates two HTML files that are log and report files. Apart from these files, an XML is generated by default that contains the metadata of all the output of the test results.
The log file presents the detailed execution report in a hierarchical manner based on the different test suites. It also has the test statistics, but the high-level overview of tests is present in the report file.
Write the first test
Let’s start writing our first test. In this first exercise we are going to do something very simple, we are going to compare two numbers. So, create a file named test1.robot and type the following on it:
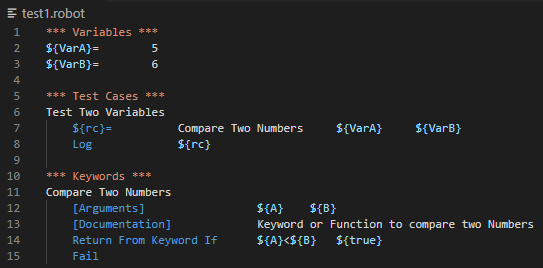
As you can see in the previous image, we only define two variables, then we create a test case where we invoke a keyword and show its value. Finally, in the keyword we make the comparison of both numbers.
Run the test locally

As seen in the image above, the steps to run the test locally are:
- Change to the working directory and activate the virtual environment.
- Run the
robot test1.robotcommand
Yes, it’s that simple.
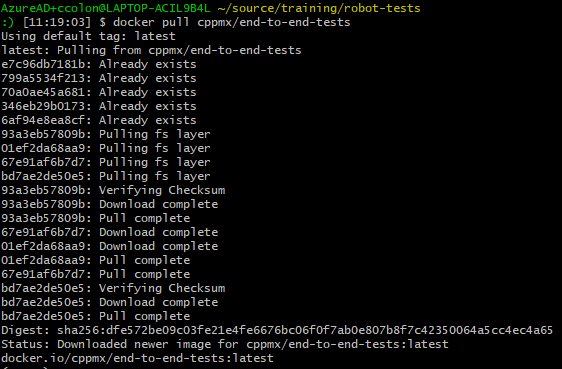
Run the test in a container
For this test we are going to use an image that is already ready for the Robot Framework tests, download the image using the following command: docker pull cppmx/end-to-end-tests
Now, execute this command from your project folder:
- On linux or Mac:
docker run -it --rm -v $(pwd):/tests:ro cppmx/end-to-end-tests /tests - On Windows:
docker run -it --rm -v %cd%:/tests:ro cppmx/end-to-end-tests /tests
The output should be like this:

Command explanation:
docker: Is the docker CLI executablerun: The Docker command to run a new container-it: The container should be run in the interactive mode--rm: When finish the execution of the container, it should be removed from the system.-v %cd%:/tests:roor-v $(pwd):/tests:ro: With this we indicate to docker that it will mount a volume. Everything in the working folder will be mounted in the container in a folder called /tests in read-only mode.cppmx/end-to-end-tests: It is the name of the image that will be used to create the container./tests: It is the folder in the container where the tests we want to run are located.
With the previous command we can run the tests inside a container, but the reports will be lost the moment the container is destroyed. To preserve the reports, we are going to create a folder called results, then we will mount it in the container, and we will instruct the Robot Framework to write the reports in that new folder.

As shown in the previous image now the new command is:
- On linux or Mac:
docker run -it --rm -v $(pwd):/tests:ro -v $(pwd)\results:/results:rw cppmx/end-to-end-tests --outputdir /results/ /tests - On Windows:
docker run -it --rm -v %cd%:/tests:ro -v %cd%\results:/results:rw cppmx/end-to-end-tests --outputdir /results/ /tests
The parameters that were added are the following:
-v $(pwd)\results:/results:rwor-v %cd%\results:/results:rw: This parameter mounts the new results directory to a /results folder of the container in write mode.--outputdir /results/: With this parameter we indicate to the Robot Framework that we want the output reports to be written in this new folder.
Now when the container is destroyed the results will still be alive in the results folder.
Testing a web interface
We already saw how to write a simple test for the Robot Framework. We have already analyzed each of the sections of a .ROBOT file, and we also ran the test in two different environments; local and with containers. Now that we have a functional testing environment it is time to do something more advanced, we are going to simulate the test of a web interface.
For this test we will make the Robot Framework search the IBM Watson site in Google. Then we will make the robot enter the site and search for a text within the page.
It is necessary that you install a Webdriver on your computer. Use the WebDriverManager, and make sure that the webdriver you install is accessible from any part of your system, that is, that it is in the Search Path. If you don’t want to install any webdriver you can carry out the tests using the container. The container we downloaded already includes the Chrome and Firefox webdriver.
Let’s start by creating a new file called test2.robot with the following content:

The first thing we will do is load the Selenium2Library library. Then we will specify what the Setup and Teardown will be for this suite. We will also define some initial variables.
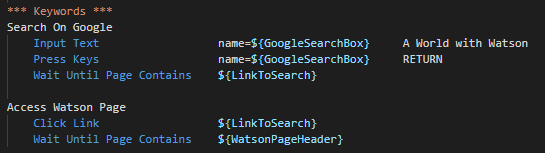
Let’s first create the keywords.

I have created two Keywords for this test. The first one searches for a text in Google, and ends until a link appears on the page.
The second one clicks on that link and once it loads the page it looks for a text on it.
Now we will call these two Keywords from our test case:
Now we just have to run the test. As you already know, you can do it from the command console either by calling the robot locally or by using a container:
- Locally: robot –outputdir results test2.robot
- Container:
- On linux or Mac:
docker run -it --rm -v $(pwd):/tests:ro -v $(pwd)\results:/results:rw cppmx/end-to-end-tests --outputdir /results/ /tests - On Windows:
docker run -it --rm -v %cd%:/tests:ro -v %cd%\results:/results:rw cppmx/end-to-end-tests --outputdir /results/ /tests
- On linux or Mac:
Summary
Robot Framework offers many advantages over other systems:
- Is Open Source.
- You can create your own Python-based libraries, which enrich the potential of the Robot Framework.
- For web test you don’t need to have a graphical interface to run the tests since the Robot Framework runs in a container.
- Supports various file formats for writing tests.
- Test cases are easy to understand as they are written in simple language.
- Jenkins has a plugin for this Framework, so it can be used for a CI/CD environment
I hope you liked it and that you found this information useful. Thank you for reading this article.